Merging Sessions
Description
When an attempt to upload a session with a label that already exists in the Project is made, the sessions can be merged together by the CNDA.
Types of Merges that can be done include:
- Scans with changes or additions to the original
- Scans with different Study UIDs
- Scans with different Series UIDs
- Scans from different sessions
Before merging, the user will be given the option to either append or overwrite the existing session.
Sometimes there are scenarios that will keep the CNDA from being able to automatically merge sessions. When this occurs, the sessions would need to be merged manually.
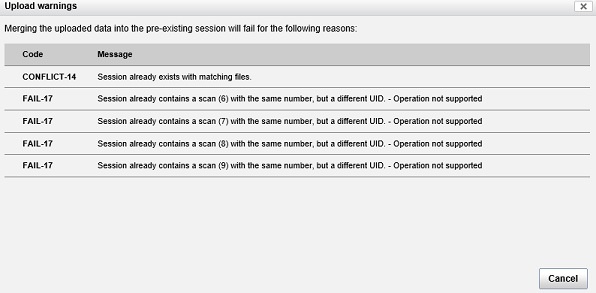
Example: Session has the same label and series number as a session in the archive, but the study and series IUD's are different. This scenario will cause Fail warnings like the ones shown below.
Instructions
Merging During an Upload
Merging During a Session Label Change
Open the Prearchive.
Check the check box next to the session that you want to modify.
Click the Review and Archive button on the right side of the screen.
Change the label to match an existing one.
Click Submit.
An Upload Warning message will appear.
To merge, overriding the conflicts, click Continue.
NOTE: Additional conflicts may appear and can also be overridden.
Merging Sessions Manually
NOTE: Applies to DICOM files only
Download each session's files. If the files were downloaded as .zip files, extract them.
Open the DICOM browser. DICOM browser can be downloaded here https://www.xnat.org/download/dicombrowser/
Open both sessions in DICOM.
In the second session perform the following steps:
a. Select the first duplicate series number, and change it to a unique number. Series number is Tag (0020,0011).
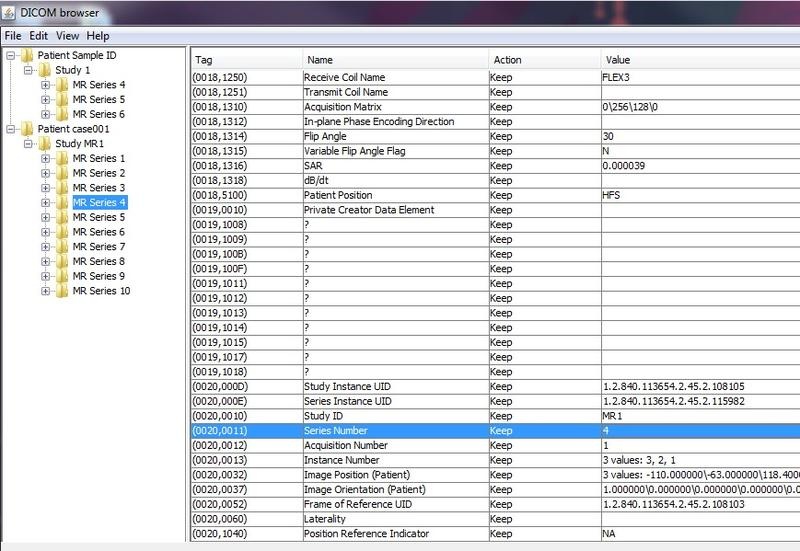
b. Select by double clicking on Value field.
c. Continue for all remaining series with numbers the same as the first session.
- Select both sessions in the browser and perform these steps:
a. Check (0008,1030) for correct project name.
b. Check (0010,0010) for correct subject name.
c. Check (0010,0020) to input the merged subject label to be used.
d. Check (0020,000D) which is the Study Instance UID.
e. Set both sessions to the first session's UID.
Send the files by selecting File.
Select Send.
Fill in the following information in on the box that will appear, if not already filled in:
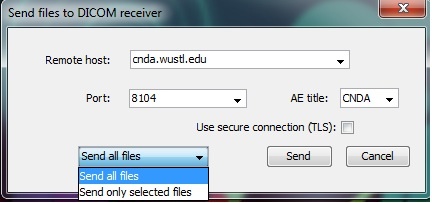
Remote Host: cnda.wustl.edu
Port: 8104
AE title: CNDA
Make sure that Use secure connection(TLS) is UNCHECKED.
Select Send all files from the drop down list.
Click Send.